ActivityTimeline provides a simple workspace that has the main features for everyday work.
Required permission:
Administrator Role;
Manager Role;
Power Employee Role;
Employee Role;
Limited Employee Role;
Team Manager Role.
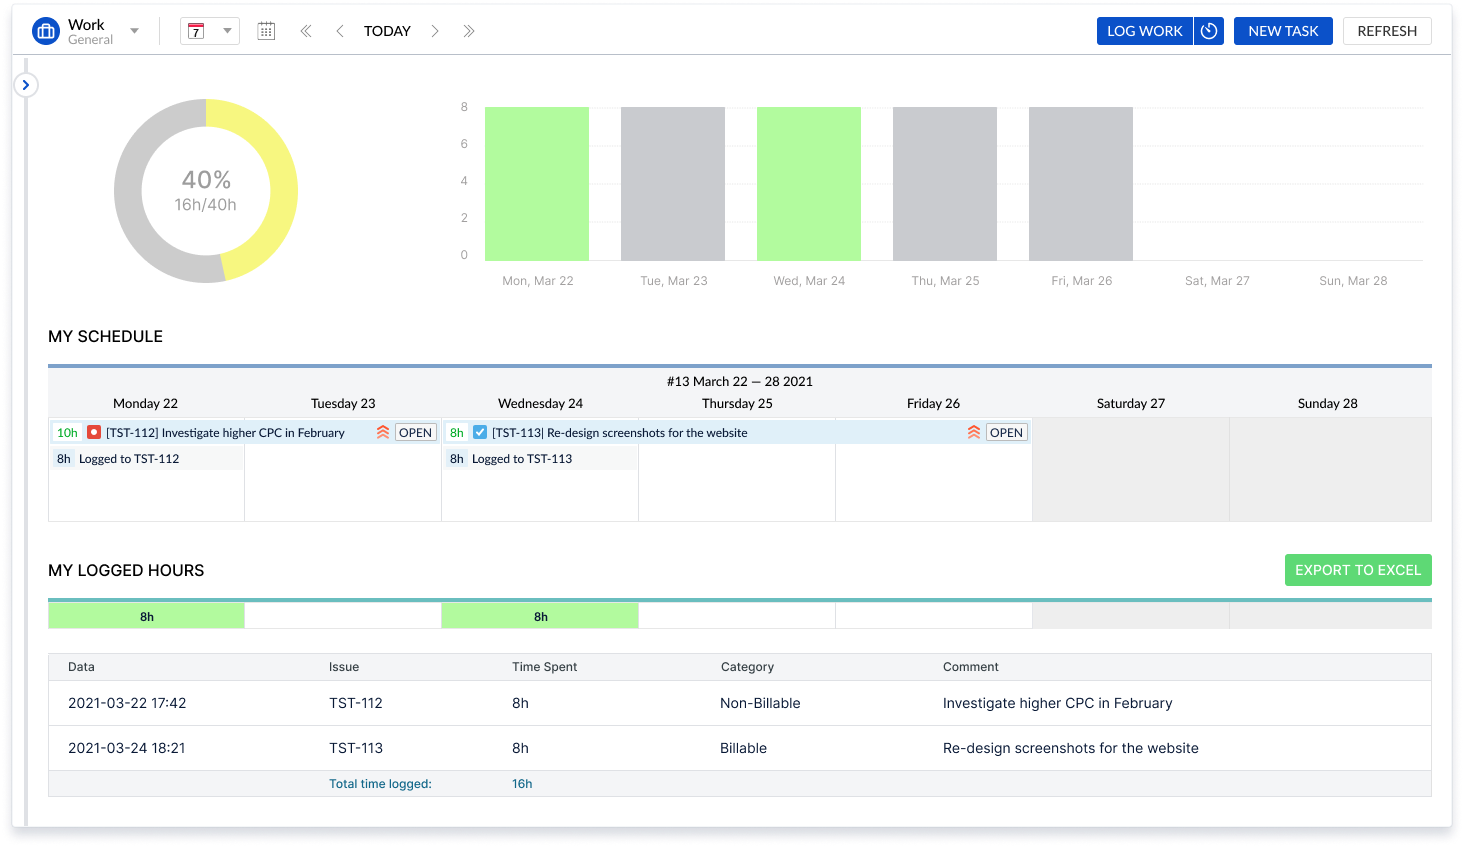
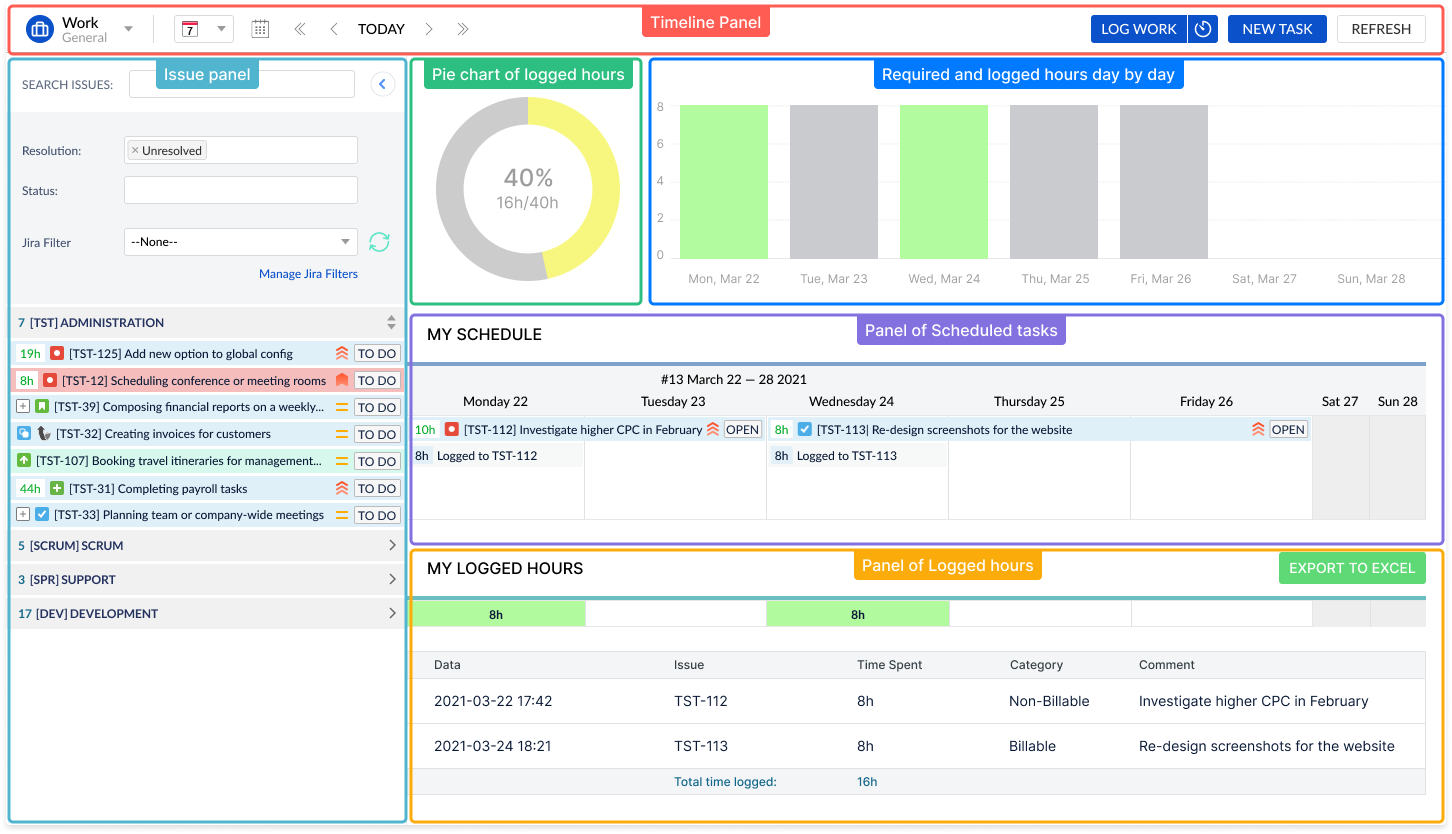
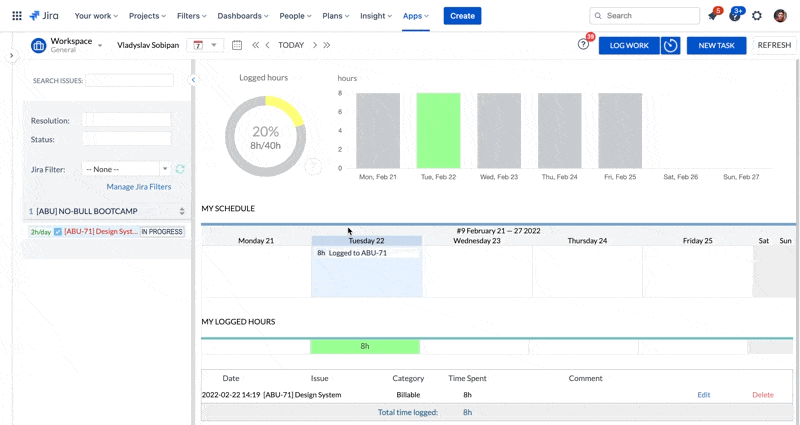
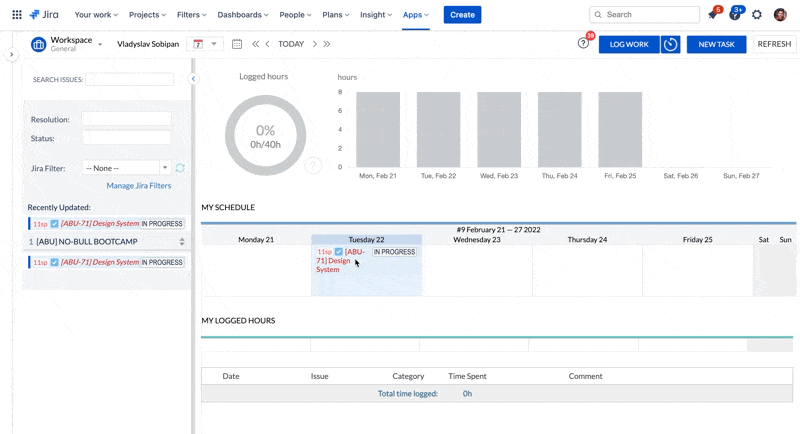
The Work page contains the Issue (left) panel, Pie chart of logged hours section, Required and logged hours day by day section, My Schedule section, Panel of Scheduled tasks, Panel of Logged hours.
Tip: To hide the left panel to compact view click on the arrow icon on the top right corner of a panel.
Main points:
| Table of Contents | ||||
|---|---|---|---|---|
|
Issue Panel
Issue Panel (left) consists of a set of JIRA tickets. The panel shows the tickets that are assigned to a currently logged user.
Quick search:
This option for JIRA issues is available at the very top of the Issues Panel. Enter issue keyword from the issue title or issue name in the Search Issues text entry box.
My Issues:
The view can be configured and changed through one of the two tabs. The available tabs are Resolution and Status.
The default state is "Unresolved" in Resolution and "All" in Status.
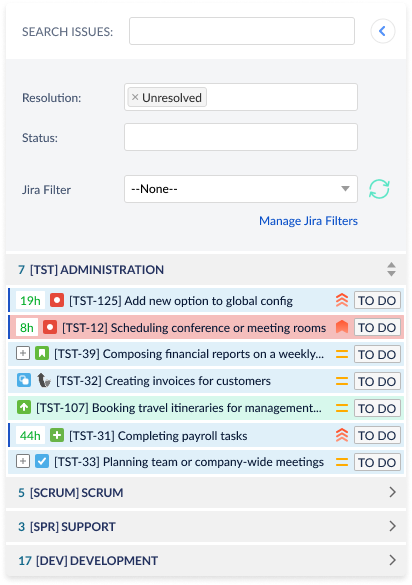
Filter by resolution
To filter tickets based on resolution, select the required resolution to filter from the Resolution multi-select drop-down list. → The system will collect all the possible resolution options available in Jira system assigned to you. You will also get custom resolutions that will be appearing based on Jira tickets.
Filter by status
Select the status as To Do from the Status multi-select drop-down list to filter by status with the latest actual tasks.
Depending on text type and color different Issue Statuses can be distinguished. To read more about Issue Status refer to a page here.
Chart
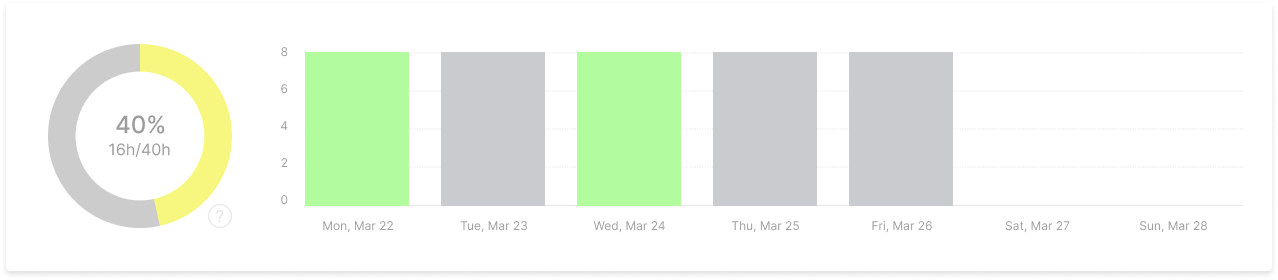
Charts on Work page visualize the progress of your work based on required hours and logged hours. You have always eye on your time.
Pie chart represents the view of Required hours, Logged hours and Remaining hours per selected period.
Bar chart represents the view of Logged hours and Remaining hours per day.
In an example below: lets select 1 weeks period . Required hours are 40h, Logged hours are 16h. The percent of filling is 40%.
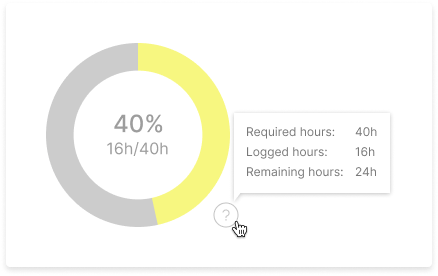
To see the details click on a question icon. You can find how many hours you need to log.

Operational buttons
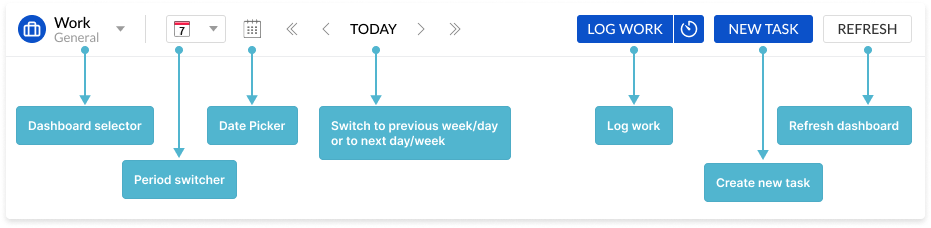

New Task - button opens the "Create new item" dialog. You can create Jira issue or custom event like booking, placeholder, note, vacation, sick leave, holiday.
Alternative way: click on a day on "My Schedule" panel when a new task should be created.
To read more about creating New Task click here.
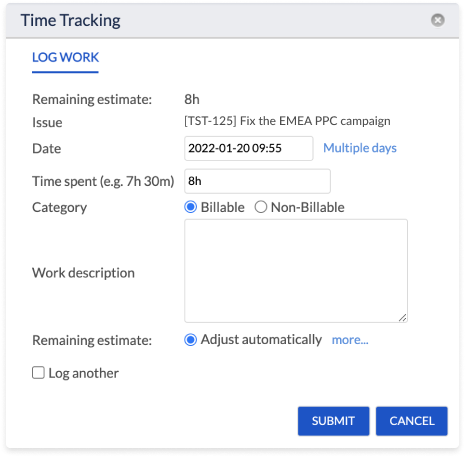
Log Work - button opens "Time Tracking" dialog to log work.
Alternative way: click on a day on "Logged Hours" panel when working hours should be created.
To read more about the Log Work option click here.
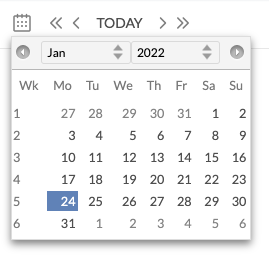
Date Picker - click on calendar date picker on toolbar → calendar is opened. Select a different week to jump to.

Calendar switch - click on the Next Day icon to switch focus to the following day; Click Next Week and switch to the following week and further on; Click Today to move to the current week.
The navigation (Next Day/Next Week) depends on the scope. For example: If you choose the "Full Month" scope then you will be able to switch to Previous Month/Next Month.
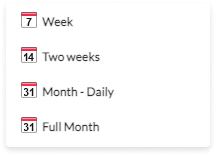
Period switcher - the user can see the timeline of the selected team for the current week (Weekly scope is the default one).
To change the scope simply click on the scope icon and select any of the available scopes: Week, Two Weeks, Month - Daily, Full Month.
My Schedule
My Schedule is a table of a timeline. On this panel, you can see, create, edit and delete Jira tasks, custom events and logged time.
On the timeline, you will see the assigned tasks that are already scheduled to you. To schedule assigned issues on your timeline possible from the left Issue Panel by yourself.


Work with tasks
How to schedule and unschedule the tasks

You can plan an issue by drag'n'drop or by clicking on it, then clicking on "Schedule" button and setting Start and End dates.
On My Schedule you can perform the drag'n' drop, resize, move operations. For more details refer to a page here.
The next operations that can be performed on My Schedule panel:
Create Jira Tickets
Create Placeholder Task
To read more click on a required link.
Worklogs on My Schedule
Beside the Jira Issues and custom events, you are able to see and log time on a ticket on My Schedule panel.
All logged hours appear on a proper day when the hours were logged. You can do it with one click on a Jira ticket. The system auto-fills in all required fields allowing to log work for a particular day (available hours to log and date).

More about logged time read on Worklog, Estimate and Time Tracking page.
To open the worklog in Jira simple click on a logged hours.
My Logged Hours
All main operations with Worklogs you can do this panel: track your worklogs, edit date, time and comment in worklog, add new or delete existing worklog.
How to Log work:
You can Log Work on My Workplace page in different ways:

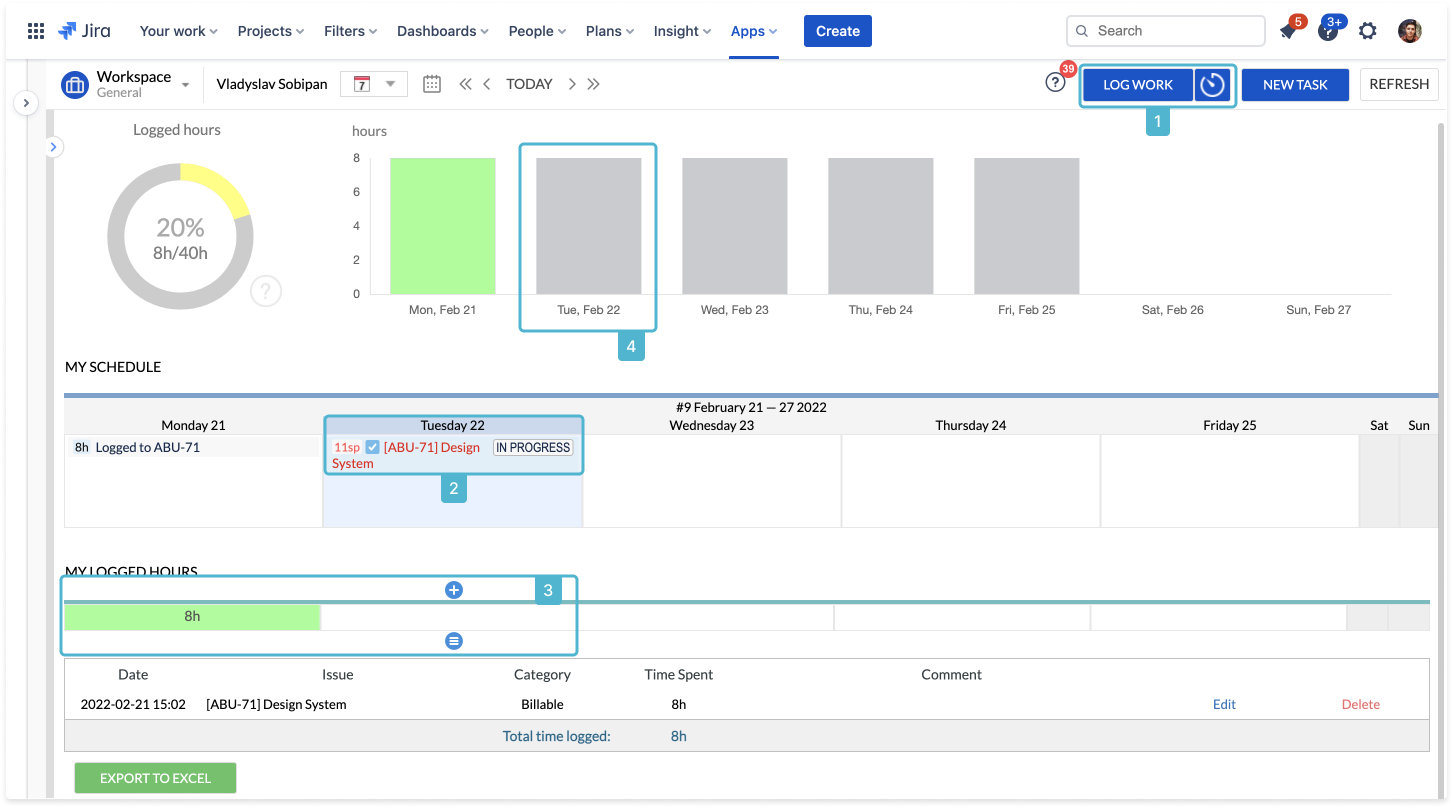
Press Log Work button.
Click on Add new worklog button
 or click on a Day cell in My Logged Hours section.
Click on Jira ticket on the Left Issues Panel or on Timeline to open Issue Card, and then click on Log work button.
Click on a Bar chart.
→ The Time Tracking panel will be opened for you with automatically filled-in time available and an issue (if single) on a particular day.
How to manage Logged Work:
First panel Worklog Hours Container holds logged hours per day. By hovering the cursor on a worklog new buttons appear: Add new worklog button and Filter worklog button .
.
Filter worklogs on a particular day by clicking on Filter worklogs button. The system will filter worklogs on that day in a Worklog table.
Second panel Worklog Table holds all worklogs for the selected period in Work#Calendar view. You can edit date, hours, comment by clicking on Edit link or delete worklog by clicking on Delete link. All changes are synchronized to Jira. Worklogs should be unapproved before you edit or delete it.
If your worklog is approved by an authorized person 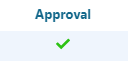 then you will not be able to change it.
-20220127-145615.png?version=1&modificationDate=1645535755304&cacheVersion=1&api=v2&width=550)
-20220127-145615.png?version=1&modificationDate=1645535767534&cacheVersion=1&api=v2&width=550)
-20220127-145615.png?version=1&modificationDate=1645535755304&cacheVersion=1&api=v2&width=544)
-20220127-145615.png?version=1&modificationDate=1645535767534&cacheVersion=1&api=v2&width=544)
Export to Excel Worklog Table
Each user can Export to Excel his own Worklog table. Administrator, Manager and Team Manager have access to Export to Excel worklog tables of other users.


In order to Export to Excel worklog table simply:
Open My Workplace page.
Choose the scope: Week, Two Weeks, Month.
Scroll the page down till the bottom.
Press Export to Excel button.
![]() Frequently Asked Question. Read more.
Frequently Asked Question. Read more.
📰 Helpful tips in our Blog.
📬 Questions? Contacts Us.
🤝 Contact details for Solution partners.
Search doсumentation
| Live Search | ||||
|---|---|---|---|---|
|